Sample integrity is critical for science, regardless of the application. Without it, laboratories face variable results, a lack of confidence in their conclusions, and potential health risks to their personnel. Compromised sample integrity may also mean conducting time- and cost-intensive experimental re-runs, which can negatively affect laboratory throughput and budget. Therefore, to deliver accurate, reliable results and workflows that can be executed confidently, efficiently, and safely, labs must prioritize the integrity of their samples.
Sample contamination is one of the biggest worries when it comes to sample integrity. It can occur at many stages of a laboratory’s operations, from sample collection, to transport, analysis, and storage. However, two of the most common risk factors are the use of inappropriate pipetting tools and poor pipetting technique.
In this article, we explore the key drivers of contamination during pipetting, showing how the right tools and pipetting best practices help maximize sample integrity for consistent success.
Contaminants in Pipetting
The major source of sample contamination during pipetting is aerosols — suspensions of solid particles or liquid droplets in a gas. While a range of laboratory activities can generate aerosols, using the wrong pipette and suboptimal technique are perhaps the most significant.
Scientists also encounter different contaminant types in the laboratory, the two major classes being biological and chemical (table 1). However, the risks and impact of the contamination type will vary greatly depending on your application. DNase contamination, for instance, is a significant concern during polymerase chain reaction (PCR), as this can lead to false results and drastically impact yields.
| Biological |
Microorganisms, DNA, RNA, DNase, RNase, endotoxins, etc. |
| Chemical |
Radioactive compounds, acids/alkalis, trace metals, corrosive materials, leachablesfrom plastic consumables, etc. |
Table 1: Overview of the different types of contaminants that may be encountered in a laboratory
Key Contamination Pathways in Your Pipetting
When it comes to pipetting workflows, laboratories must be aware of the three main potential contamination pathways:
Sample-to-Pipette Contamination
In sample-to-pipette contamination, the sample (or aerosol from the sample) enters the body of the pipette (Figure 1).
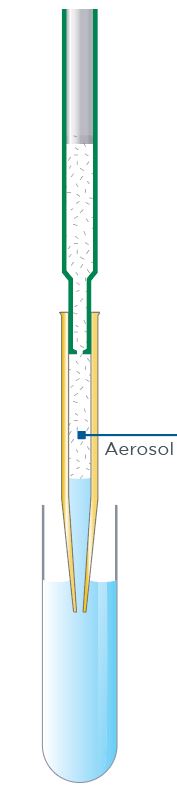
Figure 1: Sample-to-pipette contamination commonly occurs when sample aerosol enters the unprotected air space of the pipette body.
This type of contamination can occur when the pipette is held at an angle, allowing the sample to run from the pipette tip back into the pipette body. Rapid or uncontrolled dispensing can also cause sample-to-pipette contamination, both through aerosol formation and sample splashing. The risk of sample-to-pipette contamination is higher when working with volatile samples, owing to the increased chance of aerosol formation.
Pipette-to-Sample Contamination
Pipette-to-sample contamination occurs when contaminated pipettes or pipette tips introduce contaminants directly into samples.
There are several sources of pipette-to-sample contamination. One is the pipette’s composition, where antioxidants, biocides, UV stabilizers, pigments, and other components that might be included in the pipette tip plastic, leach into samples. Similarly, pipette tip manufacturing process residues can contaminate pipette tips and make their way into samples. Other sources of pipette-to-sample contamination include environmental or airborne contaminants from within the laboratory, and sample-to-pipette contamination, as described above.
Carry-Over (or Sample-to-Sample) Contamination
Here, aerosols or liquid droplets from one sample are inadvertently carried over to another sample (figure 2). This type of contamination is particularly common when pipetting multiple samples, or where multiple analysts use a single pipette.
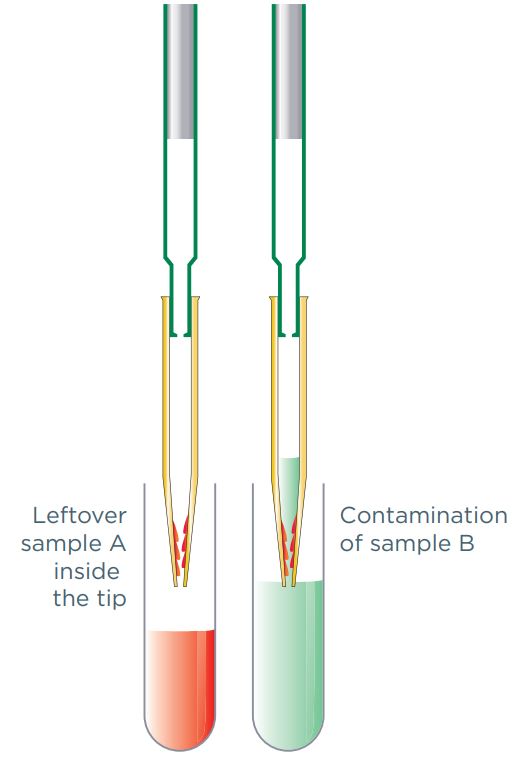
Figure 2: Carry over contamination caused by sample liquid droplets adhering to the inner pipette tip wall.
The most common cause of carryover contamination is the re-use of pipette tips, where liquid residue from a sample adheres to the pipette tip wall, and then mixes with the next sample. However, carryover contamination can also occur when aerosols from a sample contaminate the pipette body, eventually ending up in another sample.
Improving Integrity with Appropriate Pipetting Tools and Techniques
Though pipetting may look simple, many contaminants and potential contamination mechanisms can derail success. With careful consideration of pipetting tools and techniques, and frequent and appropriate decontamination, labs can minimize contamination risk and achieve optimal sample integrity.
Selecting the Right Pipetting Tools
One of the most important considerations when it comes to minimizing sample contamination is choosing which tools and consumables to use.
Critically, analysts should make sure each pipette is appropriate for the sample type involved. For most lab work involving aqueous samples, that means selecting an air-displacement pipette. For more challenging samples, such as viscous, volatile, and corrosive samples, positive-displacement pipettes are best. Whereas air displacement pipettes feature a piston that moves liquids via an unprotected air cushion, positive displacement pipettes work like a syringe: the piston, situated inside the capillary tip, comes into direct contact with the sample, thereby eliminating the unprotected air cushion. This prevents aerosol formation and eliminates sample-to-pipette contact, reducing both sample-to-pipette, and pipette-to-sample contamination. In the same way, positive-displacement pipettes help keep lab personnel safe when pipetting more challenging samples.
Selecting the right pipette tips is just as important. Here, laboratories need to consider the type, sterility, purity grade, and quality of a tip. In terms of pipette tip type, filter tips are an effective contamination-minimizing choice, as they prevent aerosols passing from the pipette tip to the pipette body and vice versa. Accordingly, filter tips reduce the risk of both sample-to-pipette and pipette-to-sample contamination (and by extension, the risk of sample carry-over contamination).
Choosing pipette tips of the correct purity and sterility grade is also key, particularly for reducing pipette-to-sample contamination. In general, laboratories should use sterilized filter tips when working on biological or clinical applications.
Using high-quality tips is another critical consideration for maximizing sample integrity. With high-quality tips, laboratories can reduce or eliminate the risk of several types of pipette-to-sample contamination. However, multiple factors determine pipette tip quality.
Using the Right Pipetting Techniques
While the right tools and equipment are crucial, appropriate pipetting technique is also essential for sample integrity:
- Hold pipettes vertically when sampling. A vertical pipette reduces the risk of the sample flowing back into the pipette and contaminating the pipette body.
- Dispense liquids slowly and carefully. Doing so will limit sample splashing and aerosol creation, both of which could contribute to sample-to-pipette contamination.
- Change pipette tips between samples. Making sure to always change your pipette tips between samples eliminates the risk of sample carry-over contamination.
- Eject tips into designated containers. When used pipette tips are disposed of properly, in their own designated containers, you reduce the risk of contamination around your workspace, which could eventually end up contaminating your pipette and samples.
- Store pipettes vertically when not in use. Using a vertical pipette rack prevents the sample from leaking back into the pipette body. Moreover, vertical storage racks keep pipettes away from desktop spills and reduce the chance of accidental pipette damage, which can compromise pipette function and lead to greater contamination risk.
Regular, Application-Appropriate Cleaning
Even when abiding strictly by the above precautions and best practices, laboratories can still end up with a contaminated pipette. Thorough decontamination is therefore also necessary.
That’s why several decontamination methods will form part of every laboratory’s Standard Operating Procedures (SOPs) and good practices. First is a daily wipe down of the outer pipette surface using a moist, lint-free cloth and a disinfectant liquid, such as 70% ethanol solution. While ethanol wipe down will help minimize contamination from microorganisms, it is less effective for eliminating other contaminants.
Autoclaving is a very common and highly effective sterilization method. It is superior to other decontamination methods, such as ethanol wipe down, as it effectively penetrates all surfaces and can eliminate more troublesome contaminants such as spores. However, you should make sure that you autoclave your pipette according to standard parameters to avoid damaging the pipette body. Also, keep in mind that not all pipettes and tips are autoclave-compatible, and that autoclaving has a limited spectrum of action (for example, it will not destroy RNase).
Several other contaminant-specific methods of decontamination are available, summarized in table 2.
| Radioactive compounds |
Detergent or cleaning solution |
Disassemble the lower part of your pipette. Fully immerse the contaminated parts* in an ultrasonic bath with a detergent or cleaning solution recommended for laboratory instruments. It is strongly recommended to rinse the pipette several times with water and dry it thoroughly. Always make sure that radioactivity has decreased to an acceptable level. |
| Viruses, bacteria, mycoplasma, fungi |
UV radiation |
Work surfaces may be decontaminated by exposure to 300 nm UV light for 15 minutes. UV will not damage Gilson PIPETMAN materials.Note that the UV rays cannot penetrate inside the pipette and cannot be considered as a decontamination protocol for the internal components of the pipette. |
| DNA, RNA, biological samples |
10% bleach solution or UV radiation |
Disassemble the lower part of your pipette. Fully immerse the contaminated parts* in at least 3% sodium hypochlorite for at least 15 minutes. Rinse thoroughly with distilled water and dry. Exposure to UV light for 30–60 minutes will further reduce DNA contamination, but not fully eliminate it from the pipette surface. |
| Aqueous solutions and buffersAcids/alkalis |
Water cleaning |
Disassemble the lower part of your pipette. Rinse the contaminated parts thoroughly with distilled water and dry. |
| Organic solventsProteins |
Detergent or cleaning solution |
Disassemble the lower part of your pipette. Fully immerse the contaminated parts* in an ultrasonic bath with a detergent or cleaning solution recommended for laboratory instruments. Rinse the pipette several times with water and then dry it thoroughly. |
Table 2: Other contaminant-specific pipette decontamination methods. Always ensure your pipette is compatible with the decontamination method.
Certain contaminants such as DNase, RNase, and endotoxins are difficult to remove, regardless of the decontamination method. This further highlights the importance of implementing appropriate preventative measures, such as using sterilized filter tips for applications such as PCR.
Supporting Superior Pipetting and Securing Sample Integrity
Contamination-free samples are critical for generating reliable, accurate results and being able to confidently execute workflows. With the right pipetting tools and techniques, and a meticulous decontamination regimen, you can effectively minimize contamination to deliver optimal sample integrity and greater laboratory success.
How to Select the Right Pipettes for Your Lab (A Full Guide)
With so many models available, choosing the right pipettes for your lab will depend on the application. Here's how to choose a pipette for your experiment.
Read More