Pipettes are an essential tool in the laboratory, but their importance goes beyond just the simple transfer of liquids. In fact, pipettes are paramount to sample integrity and, therefore, the accuracy, reliability, and reproducibility of your results. A big part of that is upkeep and keeping them free from contaminants.
Using an unclean pipette can lead to a range of problems, including inaccurate and inconsistent results, potential safety concerns from mixing incompatible liquids, and damage to the pipette itself. Contaminants such as radioactive compounds, viruses, DNA/RNA, aqueous solutions and buffers, acids and alkalis, organic solvents, and proteins can all impact the quality of your samples if they are not properly removed from the pipette. The consequences of these contaminants can be significant, such as having to restart experiments — which can be costly and time-consuming — and even the need to replace the pipette entirely.
Here we explore where contamination can come from and how to properly clean and decontaminate your pipette to protect your samples and promote reproducibility in your experiments.
Where Does Pipette Contamination Occur?
Contamination can occur in any part of the pipette that meets liquids or aerosols. The exterior of the pipette, for example, may either be exposed to droplets, come in contact withsolutions or touch the inner walls of tubes, leaving residues on the surface.
The interior of the pipette is also at risk of contamination through direct contact, including aspiration over the pipette tip volume or rotation of the pipette while it is filled with liquid. But it can be contaminated by aerosols from the sample, too. So, how is contamination removed?
To begin, you must clean your pipettes before starting to decontaminate them (typically part of the standard operating procedures (SOPs) put in place to ensure the quality and integrity of samples). In general, pipettes should be frequently cleaned for the best protection of your samples. The frequency of cleaning, however, will depend on the specific application and the type of contaminant you are working with. For example, in molecular biology, wiping the pipette with an enzyme decontaminant is recommended before each use. Different types of pipettes, such as single and multichannel pipettes, also require tailored cleaning and decontamination procedures to ensure their proper function.
Cleaning Variable Volume Single and Fixed Pipettes
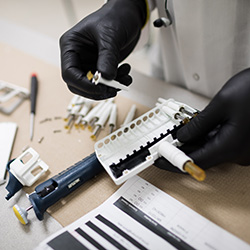
A high-quality pipette can be disassembled for easier cleaning and decontamination. Gilson recommends using a lint-free tissue or cloth lightly coated in an alcohol solution for wiping the pipette parts.
Pipette disassembly varies by model, so check the instruction manual for your specific pipette. The disassembled PIPETMAN® Classic is shown in Figure 1 as an example.
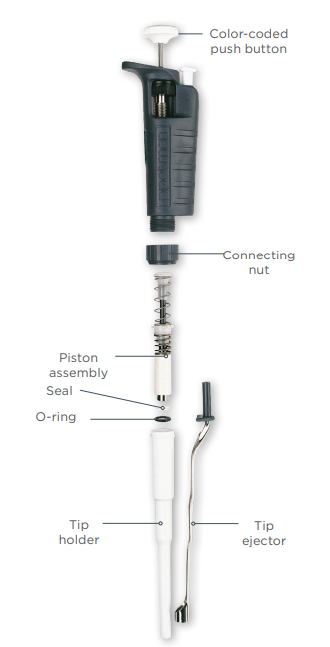
Figure 1: Disassembly of the PIPETMAN® pipette.
External Cleaning
To clean the exterior of a pipette:
- Remove the tip ejector and wipe it down.
- Wipe all exposed surfaces, including the body, button, operating rod, and tip holder. Pay particular attention to cleaning up any scuffs, wear marks, and build-ups in concave surfaces.
- If the pipette is particularly dirty, you can use a brush with soft plastic bristles to help remove any stubborn dirt or debris.
- Once you have thoroughly cleaned the exterior surfaces of the pipette, refit the tip ejector, and allow the pipette to dry fully.
- To finish, give the outer surfaces a final wipe with a cleaning solution to remove any remaining residue, and allow the alcohol to evaporate.
It is important to make sure that the pipette is completely dry before use to prevent any contamination from the cleaning solution.
Internal Cleaning
Cleaning the interior of a pipette should only be carried out by trained personnel, as incorrect reassembly can damage the pipette and affect its performance —most notably leading to decreased accuracy through pipette leakage.
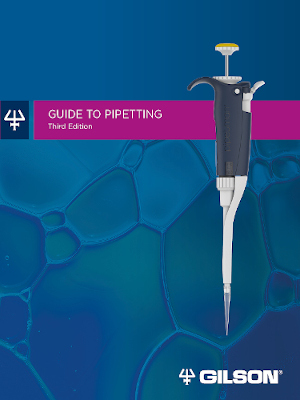
Gilson’s Guide to Pipetting
Could you or your team benefit from training in basic pipette servicing and maintenance? Look no further than Gilson’s Guide to Pipetting.
DOWNLOAD
To clean the interior, begin by disassembling the pipette and setting the upper part aside in a clean, dry location. Using alcohol-coated wipes, wipe down the entire interior of the pipette, including the body interior, connecting nut, tip holder, O-ring, seal, and the piston's stainless steel surface area. It is critical to make sure that the piston is completely dry to prevent corrosion, especially with Gilson’s PIPETMAN P1000, P5000, and P10mL pipettes. If any parts of the pipette are damaged, you should discard and replace them.
Once you have thoroughly cleaned the interior of the pipette, allow the alcohol to evaporate. Refer to your instruction manual to determine if any parts (such as the piston assembly and the seals) need lubricating, then reassemble the pipette as directed.
Cleaning Multichannel Pipettes
Multichannel pipettes should also be cleaned using a lint-free tissue or cloth lightly coated in alcohol solutions, but the procedure is slightly different.
To clean a multichannel pipette, start by removing the tip ejector and spacers and wipe them both down. Then, wipe down the entire body and lower housing of the pipette. To ensure that the tip holders are thoroughly cleaned, you can use a flossing method to wipe the entire surface of the holders.
After you have cleaned all parts of the pipette, reassemble it, and leave it to dry. Once the pipette is dry, give the outer surfaces a final wipe with alcohol to remove any remaining residue, and allow the alcohol to evaporate before use.
Immersing Pipettes
While it is possible to clean pipettes using immersion cleaning, this method is not recommended for general cleaning as it can be very difficult to fully dry all the components —which can lead to piston corrosion. If you do need to use immersion cleaning, there are some specific guidelines you should follow depending on whether you are working with a single channel or multichannel pipette.
For single channel pipettes, make sure to only immerse appropriate components in the cleaning solution, such as the connecting nut, tip ejector, tip holder, piston assembly, seal, and O-ring. You can clean the individual components of the lower part of the pipette in one of two ways: by placing them in an ultra-sonic bath for 20 minutes at 50 °C, or by using a soft cloth and brushes. If you choose the ultra-sonic bath method, degrease the piston assembly and seals using either isopropanol or ethanol before immersing them in the bath.
Once the components are clean, rinse them with distilled water and dry them either naturally or with a clean soft cloth or lint-free tissue. Finally, reassemble the pipette according to the instruction manual.
For multichannel pipettes, there are only three components that can be immersed in a cleaning solution: the tip ejector, ejector locks, and the ejector spacer. Follow the same procedure as with single channel pipettes to clean these components, making sure to rinse and dry them thoroughly before reassembling the pipette.
Should I Autoclave My Pipette?
Autoclaving pipettes is another way to clean them without requiring disassembly. Many pipettes, such as the Gilson PIPETMAN® line of pipettes, have certain parts that are autoclavable, such as the tip ejector, tip holder, and connecting nut. However, some pipettes can be autoclaved in their entirety, so look for ones that are suitable for this approach.
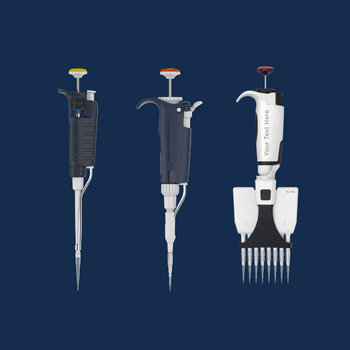
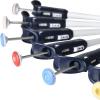
PIPETMAN® Pipettes
For more than 50 years, we’ve been creating pipettes with accuracy, comfort, and reliability as a top priority. Today, we offer a variety of pipettes in a range of ergonomic designs and volume sizes that enhance your pipetting experience and help you achieve reproducible, reliable results.
LEARN MORE
To autoclave your pipette:
- Set the volume to the nominal volume and unlock the volume locking system.
- Autoclave the pipette at 121 °C (252 °F), under 1 bar relative pressure, for 20 minutes. It is not necessary to use a bag for the pipette, as it will dry better and faster without it.
- After the autoclaving cycle is complete, leave the pipette to cool down overnight back to room temperature and make sure it is completely dry before use.
Before using it, check the pipette in accordance with your SOPs to ensure that it is functioning properly.
For pipettes with autoclavable parts, clean the parts before placing them in an autoclaving bag. Autoclave the parts for 20 minutes at 121°C, 0.1 MPa, and then leave them to dry before reassembling the pipette. Once you have reassembled the pipette, leave it to cool to room temperature before use.
Chemical Decontamination
After cleaning your pipette, you may want to decontaminate it chemically to ensure that it is free of any remaining contaminants. The decontaminant used will vary depending on the cause: see Table 1. However, it is important to check with the decontaminant supplier to ensure that it is appropriate for use with the materials of your pipette, such as polypropylene. It is also recommended to perform a patch test first to ensure that the decontaminant is compatible with the pipette.
| Radioactive compounds |
Detergent or cleaning solution |
Disassemble the lower part of your pipette. Fully immerse the contaminated parts* in an ultrasonic bath with a detergent or cleaning solution recommended for laboratory instruments. It is strongly recommended to rinse the pipette several times with water and dry it thoroughly. Always make sure that radioactivity has decreased to an acceptable level. |
| Viruses, bacteria, mycoplasma, fungi |
UV radiation |
Work surfaces may be decontaminated by exposure to 300 nm UV light for 15 minutes. UV will not damage Gilson PIPETMAN materials.Note that the UV rays cannot penetrate inside the pipette and cannot be considered as a decontamination protocol for the internal components of the pipette. |
| DNA, RNA, biological samples |
10% bleach solution or UV radiation |
Disassemble the lower part of your pipette. Fully immerse the contaminated parts* in at least 3% sodium hypochlorite for at least 15 minutes. Rinse thoroughly with distilled water and dry. Exposure to UV light for 30–60 minutes will further reduce DNA contamination, but not fully eliminate it from the pipette surface. |
| Aqueous solutions and buffersAcids/alkalis |
Water cleaning |
Disassemble the lower part of your pipette. Rinse the contaminated parts thoroughly with distilled water and dry. |
| Organic solventsProteins |
Detergent or cleaning solution |
Disassemble the lower part of your pipette. Fully immerse the contaminated parts* in an ultrasonic bath with a detergent or cleaning solution recommended for laboratory instruments. Rinse the pipette several times with water and then dry it thoroughly. |
Table 1: Recommended solutions for pipette decontamination based on cause, adapted from Gilson’s Guide to Pipetting.
To chemically decontaminate the pipette, simply repeat the appropriate steps for your pipette using the decontaminant in place of the cleaning solution. Once you have finished decontaminating the pipette, leave it to dry and check for any unwanted residues that may negatively impact the pipette's function and performance.
A Cleaner Pipette for Samples You Can Trust
Minimizing contamination is crucial to support the integrity of your samples and ensure that you obtain reliable and repeatable results. Proper cleaning and decontamination of your pipette can enable standardized processes for cost-effective workflows and services, improving the reputation of your laboratory even further.
Taking the time to carefully clean and decontaminate your pipette regularly is key to maintaining the quality of your samples. Proper training is also essential to ensure that you can safely and effectively clean and decontaminate your pipette —if you are unsure how to disassemble and reassemble your pipette, seek the assistance of an authorized service center. By following these guidelines, you can help ensure that your pipette is clean and ready for use, protecting the integrity of your samples and the reliability of your results.
Learn more about how to maintain your pipette effectively to benefit from more accurate workflows and have even greater confidence in your results. Still have questions on how to clean your pipette for better results? Then contact Gilson and speak to our experts today.